 Pin it
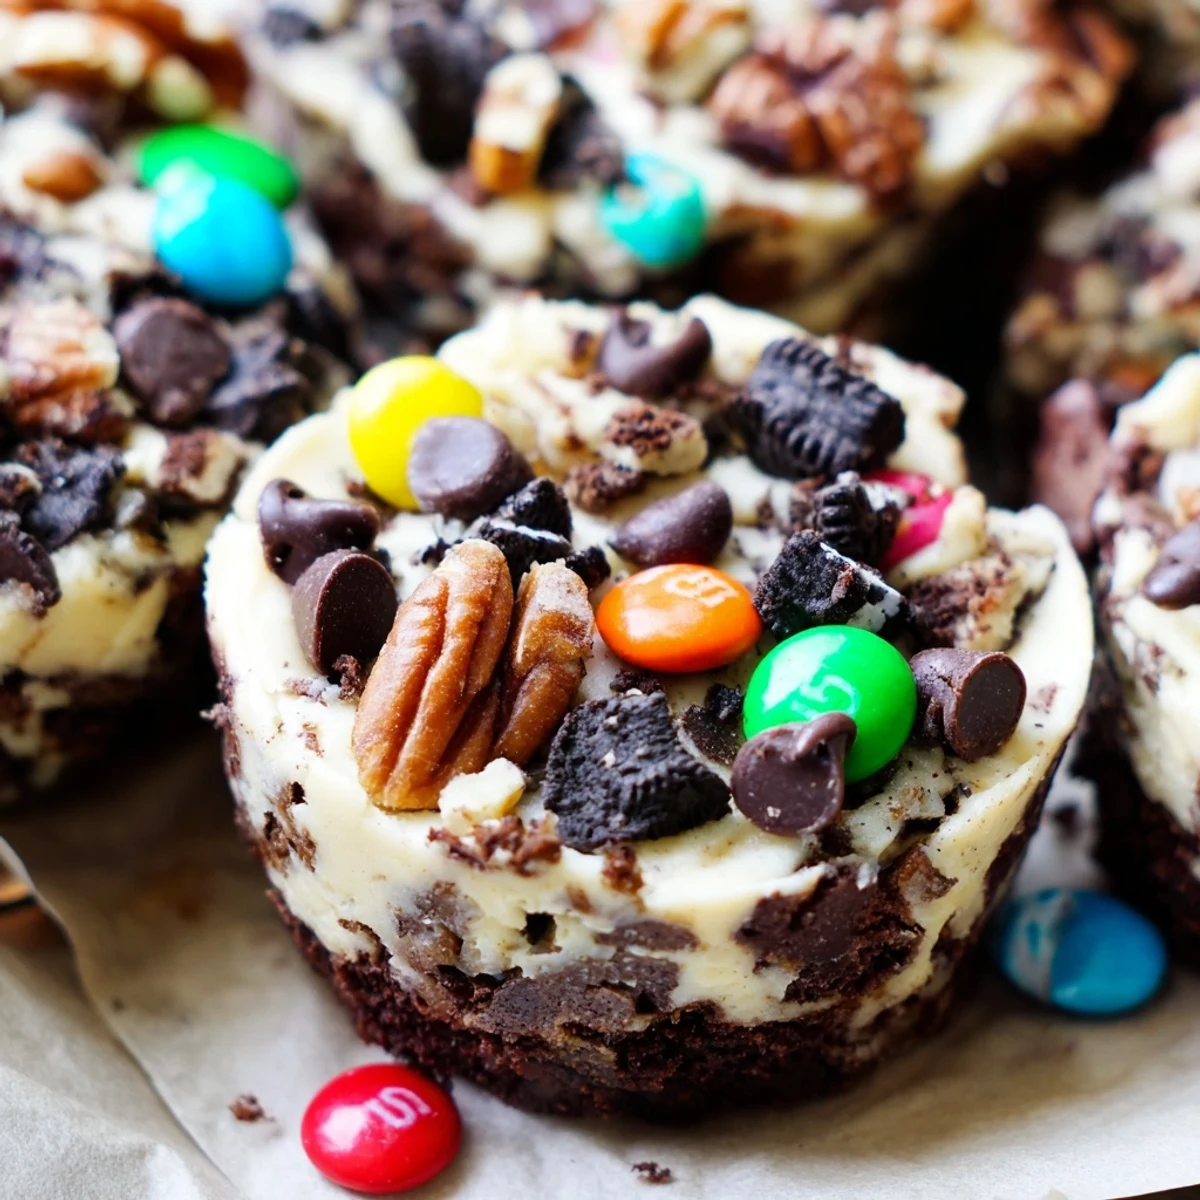
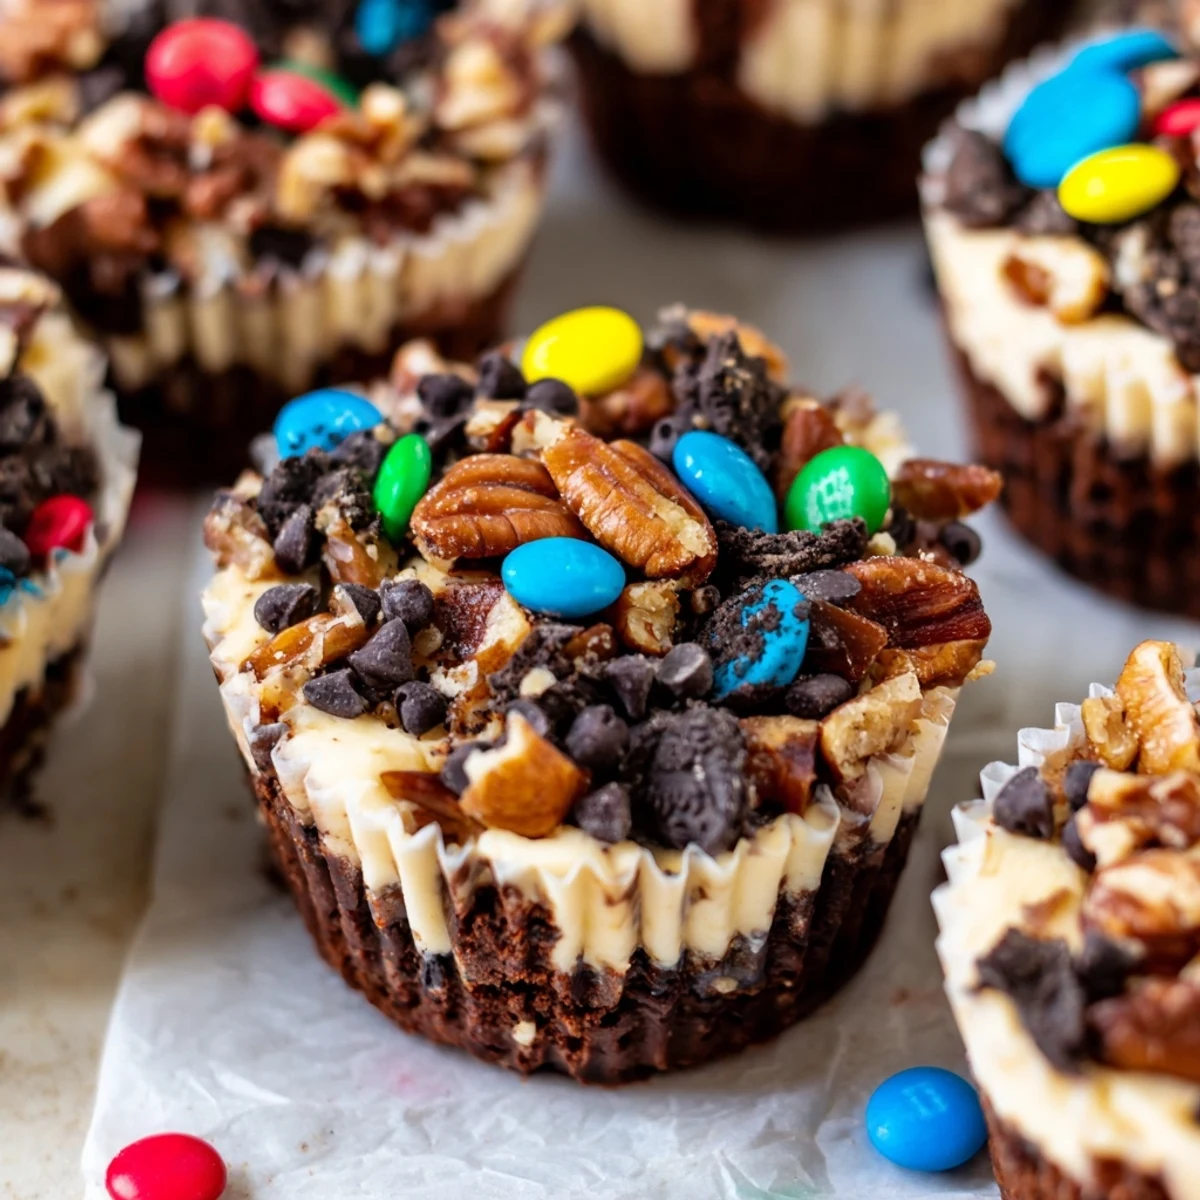
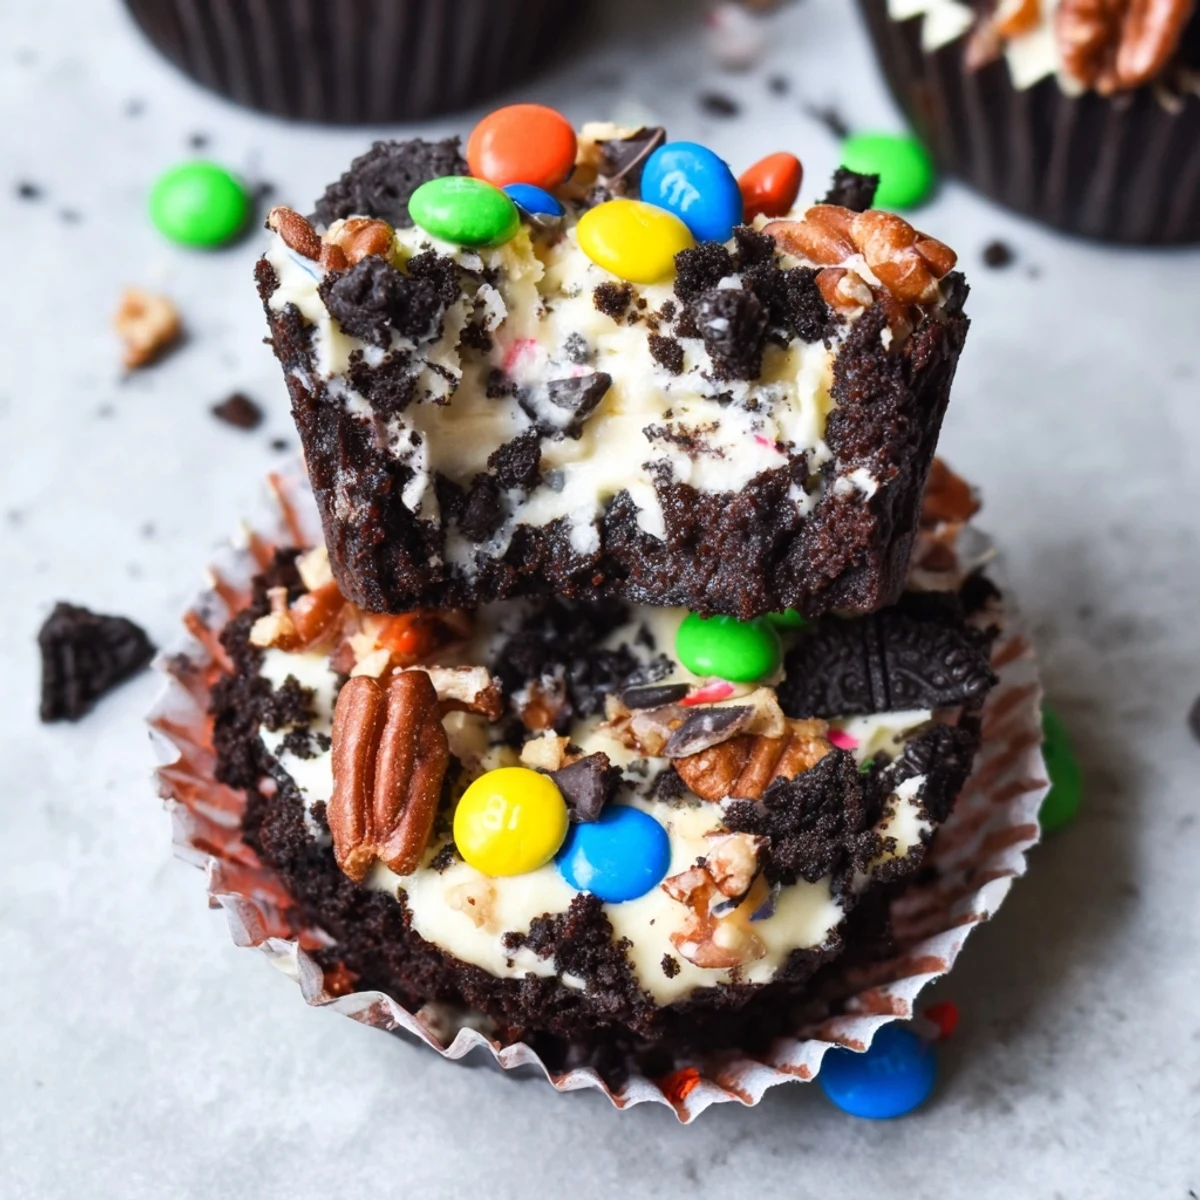
 These loaded brownie cheesecake cups combine two beloved desserts into one irresistible treat. The foundation starts with a rich, fudgy brownie base made with melted butter, cocoa powder, and both granulated and brown sugars for depth. A smooth, creamy cheesecake filling gets swirled on top, then each cup is generously sprinkled with a medley of toppings—mini chocolate chips, crunchy pecans or walnuts, crushed Oreos, and colorful mini M&Ms.
The result is a stunning layered dessert that looks impressive on any dessert table. The brownie provides that intense chocolate richness while the cheesecake adds a cool, creamy contrast. The various toppings add different textures and flavors in every bite. Perfect for parties, holidays, or whenever you want to treat yourself to something truly special. Best served chilled after at least an hour in the refrigerator.
The smell of brownies baking has this way of stopping everyone in their tracks, but when you add cheesecake into the equation, something magical happens. I discovered this combination on a rainy Sunday when I had half a box of brownie mix and leftover cream cheese from a failed cheesecake experiment. These little cups ended up being the best kitchen mistake I ever made, and now they are the most requested treat at every gathering.
My friend Sarah actually cried when she first tried these, which I took as the highest possible compliment. We were sitting on my back porch watching a summer storm roll in, and she said the chocolate and cream cheese combo reminded her of her grandmothers famous birthday cake. Now whenever I make them for game night, everyone fights over the last one.
Ingredients
- Unsalted butter: Melting this first creates that glossy, shiny batter that promises fudgy results every time
- Granulated and brown sugar: The brown sugar adds moisture and depth while the white sugar creates that crackly top we all love
- Large eggs: Room temperature eggs incorporate better and prevent the cheesecake from curdling
- Vanilla extract: Do not skip this, it amplifies the chocolate flavor in ways you cannot explain until you taste it
- Unsweetened cocoa powder: Use a good quality brand here because cheap cocoa makes everything taste dusty and flat
- All-purpose flour: Just enough to give structure without turning these into cakey brownies
- Salt: This tiny amount makes all the chocolate flavors pop and rounds out the sweetness
- Cream cheese: Must be completely softened or you will end up with lumpy cheesecake filling
- Mini chocolate chips: These melt perfectly into the warm cheesecake layer creating pockets of gooey chocolate
- Chopped pecans or walnuts: Toast them beforehand for an even nuttier flavor that cuts through the richness
- Crushed Oreos: The cookies soften slightly in the oven while keeping that signature crunch
- Mini M&Ms: These add the perfect pop of color and hold their shape beautifully while baking
Instructions
- Get your oven ready:
- Preheat to 175°C (350°F) and line your 12 cup muffin tin with paper liners, or give it a thorough greasing if you prefer going liner free.
- Make the brownie magic:
- Melt the butter in a medium bowl, then whisk in both sugars until the mixture turns glossy and smooth like chocolate syrup.
- Add the wet ingredients:
- Beat in the eggs and vanilla until everything is completely combined and the mixture looks glossy and thick.
- Bring in the dry stuff:
- Sift in the cocoa powder, flour, and salt, then fold everything together just until no dry streaks remain.
- Divide and conquer:
- Spoon about one heaping tablespoon of brownie batter into each muffin cup, keeping them roughly equal for even baking.
- Whip up the cheesecake:
- In a separate bowl, beat the softened cream cheese until completely smooth, then add the sugar, egg, and vanilla until creamy and lump free.
- Layer it up:
- Gently spoon about one tablespoon of cheesecake mixture over each brownie base, being careful not to disturb the chocolate layer too much.
- Go wild with toppings:
- Generously sprinkle each cup with whatever combination of chocolate chips, nuts, Oreos, and M&Ms makes your heart sing.
- Bake to perfection:
- Slide them into the oven for 22 to 25 minutes until the cheesecake is set and the brownie edges are firm but the centers still look slightly soft.
- Patience pays off:
- Cool in the pan for 10 minutes, then move them to a wire rack before chilling for at least one hour—the texture transformation in the fridge is worth the wait.
 Pin it
 My dad, who claims he does not have much of a sweet tooth, ate three of these in one sitting and then asked if he could take the rest home. Seeing someone who usually turns down dessert get excited about something you made is pretty much the best feeling in the world.
Making Them Your Own
The beauty of these cups is that they are basically a blank canvas for whatever you are craving. Sometimes I swap the Oreos for crushed pretzels when I want that salty sweet combo, or I will add peanut butter chips instead of chocolate chips. Once I even threw in some chopped Reese is Cups and my brother said they were the best thing he ever ate.
Getting The Texture Right
The key is pulling them out at that perfect moment when the cheesecake is set but still has a slight wobble in the center. They continue cooking as they cool, and if you wait until they look completely done in the oven, you will end up with dry, crumbly cups instead of fudgy ones. I learned this the hard way after making three batches in one week trying to figure out what went wrong.
Serving And Storing
These need that hour in the fridge to really come together, so plan ahead and do not try to rush the process. I like to take them out about 15 minutes before serving so they are not ice cold, but they are also pretty incredible straight from the refrigerator on a hot day.
- Keep them in an airtight container in the fridge for up to five days
- They actually freeze really well if you want to get ahead for parties
- Serve with cold milk or hot coffee to balance out all that richness
 Pin it
 There is something about the combination of warm fudgy brownie and cool creamy cheesecake that just hits different. Hope these become your go to treat for all the moments worth celebrating.
Recipe FAQs
- → Can I make these brownie cheesecake cups ahead of time?
-
Yes, these actually taste better when made ahead. Store them in an airtight container in the refrigerator for up to 5 days. The chilling time allows the flavors to meld and the cheesecake layer to set properly, making them easier to handle and serve.
- → What other toppings work well with these cups?
-
Feel free to get creative with your mix-ins. Peanut butter chips, toffee bits, shredded coconut, crushed pretzels, or sliced almonds all make excellent additions. You can also drizzle with caramel or chocolate sauce after baking for extra indulgence.
- → How do I know when the cups are done baking?
-
The cups are ready when the cheesecake layer is set and no longer jiggles in the center, and the edges of the brownie are firm to the touch. The center should still be slightly fudgy but not raw. A toothpick inserted into the brownie portion should come out with moist crumbs, not wet batter.
- → Can I freeze these loaded brownie cups?
-
Absolutely. Once completely cooled, wrap each cup individually in plastic wrap and place in a freezer-safe container. They'll keep well for up to 3 months. Thaw overnight in the refrigerator before serving for the best texture and flavor.
- → Is it possible to make these gluten-free?
-
Yes, simply substitute the all-purpose flour with a reliable 1:1 gluten-free flour blend. Ensure that your other ingredients, particularly the crushed cookies and any toppings, are certified gluten-free as well. The texture remains excellent with this substitution.
